
Fischer-Keres, Bled 1961
Jonathan Yedidia
Amidst all the excitement generated by the return of Bobby Fischer to the
world chess scene, and the attention lavished on the latest Fischer games,
we should remember that there exists a vast treasure trove of practically
unanalyzed "early" Fischer games. Aside from those treated by
Fischer himself in his My 60 Memorable Games, remarkably few of his
games, especially those from before 1970, have been studied seriously.
The Fischer student has at his disposal a choice of game collections, including
the original descriptive notation Bobby Fischer's Chess Games edited
by Wade and O'Connell; the figurine algebraic notation Fischer's Chess Games
from Oxford University Press, which incorporates some light Informant-style
notes from a variety of sources; in German, Die Gesammelten Partien von
Robert J. Fischer, edited by Christiaan M. Bijl; and the latest and
most complete, algebraic notation Bobby Fischer, Complete Games of the
American World Chess Champion, edited by Lou Hays with very light annotations
by John Hall. Bobby Fischer: Profile of a Prodigy, by Frank Brady,
also includes 90 of his games with what could be termed "entertaining"
annotations.
And it is certainly worthwhile to go back and take a closer look at these
games, for as Raymond Keene points out in his introduction to Fischer's
Chess Games, "Fischer is one of the few players of whom it can
be said that virtually every game in which he is involved is worthy of publication
and full of interest." The game analyzed here, played against Keres
in Bled 1961, is one example.
In 1931, Alexander Alekhine won an important international tournament in
Bled, ahead of Bogolyubov and Nimzovich. Thirty years later, in 1961, Bled
hosted the Alekhine Memorial tournament, which attracted so many of the
world's strongest grandmasters that it was hailed as the "tournament
of the century." The Soviet Union sent Tal, Keres, Petrosian, and Geller,
while the United States was represented by Bisguier and Fischer. Other strong
grandmasters included Darga, Donner, Gligoric, Ivkov, Matanovic, Najdorf,
Olafsson, Pachman, Parma, Portisch, and Trifunovic.
Recently deposed World Champion Mikhail Tal showed that he had recovered
his form after his defeat in the rematch against Botvinnik by capturing
first place. The real sensation of the tournament, however, was the second-place
finish of the eighteen-year-old Fischer, who was the only contestant who
did not lose a game. Every game he played was an exciting struggle, and
he would later include four of his victories (against Tal, Geller, Petrosian,
and Trifunovic) and one of his draws (against Gligoric) in his My 60
Memorable Games. Gligoric was sufficiently impressed to declare that
"Bobby is going to be world champion."
The one Soviet who was barely able to survive with a draw against Fischer
was the veteran Paul Keres, who was still at the height of his powers, and
who ultimately tied for third place with Petrosian and Gligoric. Their game
was played in the sixteenth round (out of nineteen), when Fischer was tied
for the lead with Tal. It has not been seriously analyzed (at least in in
any publication that is easily accessible to modern chessplayers), and while
it was not error-free, it was certainly a hard-fought struggle worthy of
both combatants.
The game features an opening that is still of great theoretical importance
to the Two Knights variation of the Caro-Kann Defense, a middlegame with
a strategic positional phase followed by a complicated and exciting tactical
phase, and finally an instructive endgame.
Fischer-Keres, Bled 1961
Caro-Kann Defense B11
1 e4 c6
Keres probably used the Caro-Kann Defense, which was somewhat unusual in
his repertoire, because, as he later wrote, he believed that Fischer's "judgment
of a variation ... seemed not to be quite correct."
2 Nc3 d5 3 Nf3
Fischer once again resorts to his then-favorite Two Knights variation against
the Caro-Kann, even though he had suffered two defeats with it against Keres
in the 1959 Candidates tournament. In fact, Petrosian, Smyslov, Olafsson,
and Benko also played the Caro-Kann against Fischer in that tournament,
and every time, Fischer reliably responded with the Two Knights. As he explains
(in his annotations to his draw against Petrosian from that tournament),
the purpose of this line is to exclude the Classical 4 ... Bf5 variation.
For example, after 3 ... dxe4 4 Nxe4 Bf5?! (4 ... Nf6 or 4 ... Nd7 are playable)
5 Ng3 Bg6? (5 ... Bg4 6 h3 Bxf3 7 Qxf3 only gives White a small advantage)
6 h4 h6 7 Ne5 Bh7 8 Qh5 g6 9 Bc4 (also good is 9 Qf3 Nf6 10 Qb3, winning
material as in Lasker--Muller, Zurich 1934) e6 10 Qe2, "Black has a
terrible game" (Alekhine--Bruce, Plymouth 1938). Black can also fall
into this trap through a transposition: 3 ... dxe4 4 Nxe4 Bg4 5 h3 Bh5 (after
5 ... Bxf3, White again has a small advantage) 6 Ng3 Bg6? 7 h4!
3 ... Bg4
In 1959, Olafsson tried 3 ... Nf6?! against Fischer, and got a bad position
after 4 e5 Ne4 5 Ne2 Qb6 6 d4 c5 7 dxc5 Qxc5 8 Ned4 Nc6 9 Bb5 a6?! 10 Bxc6+
bxc6 11 0-0 Qb6 12 e6! fxe6 13 Bf4.
4 h3 Bxf3
An important juncture, where Black must choose between giving up the two
bishops by 4 ... Bxf3 and entering the sharp complications of 4 ... Bh5.
Both possibilities are considered adequate, but in the 1959 Candidates tournament,
Keres, Petrosian, and Benko all chose 4 ... Bxf3, and only Smyslov dared
4 ... Bh5. That game continued 5 exd5 cxd5 6 Bb5+ Nc6 7 g4 Bg6 8 Ne5 Rc8
9 d4 e6 10 h4?! (10 Qe2, preventing f6, is the main line. The current theoretical
verdict, based on lines which extend beyond the 25th move, is that Black
can maintain the balance) f6 11 Nxg6 hxg6 12 Qd3 Kf7 13 h5 gxh5 14 gxh5
Nge7, and Black gradually took over the initiative, although the game ended
in a draw.
5 Qxf3
Now that Fischer has gained his beloved advantage of the two bishops, the
strategic aims of the next few moves are determined. White wants to open
up the game and create pawn imbalances, so that his two bishops can be put
to use. As we shall see, Fischer succeeds in these aims when Keres backs
down from a challenge on the thirteenth move.
5 ... Nf6
The alternative 5 ... e6 allows White to try the promising pawn sacrifice
6 d4 dxe4 7 Nxe4 Qxd4 8 Bd3. Nevertheless, an adventurous player of Black
could test Suetin's suggestions of 8 ... Nf6 9 Be3 Qxb2!? or 8 ... Nd7 9
Be3 Qd5 10 0-0-0 Qxa2!?
6 d4
Here Fischer varies from his earlier 6 d3, which usually results in a slower
maneuvering battle. He was apparently dissatisfied with the result of the
opening of this game, for he later labeled 6 d4 as "inferior"
and returned to 6 d3 in his game against Cagan in Israel, 1968. The idea
of 6 d4 is to try to open the game up for the two bishops, but White must
pay the price of either a pawn or some tempi.
6 ... dxe4 7 Qe3 (D 1)
The pawn sacrifice 7 Nxe4?! is now dubious because of 7 ... Qxd4 8 Bd3 Nbd7!
threatening Ne5 (Fischer).
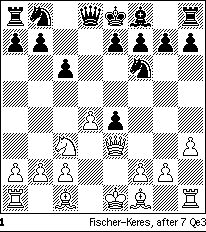
7 ... Nbd7
Black can try to hang onto his pawn with 7 ... Qa5, but after 8 Bd2 Qf5,
White has a choice between recovering the pawn by 9 g4 Qf3 (9 ... Qg6? 10
Bg2 with advantage for White, Kopleva--Kupchik, 1960) 10 Rg1 followed by
Bg2 or playing for an attack with 9 0-0-0 e6 10 f3!? exf3 11 g4 Qa5 12 Bc4
as in Mesing--Nemet, Yugoslavia, 1967.
7 ... Nd5 also plays into White's hands: 8 Qxe4 Nxc3 9 bxc3 Nd7 10 Rb1 Qc8
11 c4 e6 12 Bd3 Be7 13 0-0 and White is better (Boleslavsky).
8 Nxe4 Nxe4
Suetin suggests 8 ... e5, and claims that after 9 Nxf6+ Qxf6 10 f4!? Qxf4
11 Qxf4 exf4 12 Bxf4 Nb6 13 0-0-0 0-0-0 "Black has no trouble,"
but White's game looks preferable. Keres's plan is straightforward and good.
9 Qxe4 Nf6 10 Qd3 Qd5!
This centralization of the queen is very strong, as it strengthens Black's
control of a complex of important light and central squares, and disrupts
White's development. Fischer cuts off his discussion of this game in his
notes to the 1959 Petrosian game by judging this position as equal, which
seems like a fair evaluation.
Other moves would give White at least a slight advantage. For example: 10
... e6 11 Be2 Be7 12 0-0 0-0 with a white edge (Boleslavsky) or 10 ... Qb6
11 Be2 e6 12 0-0 Be7 13 c4 Rd8 14 Be3 c5 15 Rfd1 0-0 16 Qb3 and White had
a strong initiative in Mesing--Shamkovich, Timisoara, 1972. If 10 ... Qd6
11 Be2 e5!? White has the strong reply 12 Be3!
11 c4
The only way to make progress. The ending after 11 Qb3 0-0-0 12 Qxd5 cxd5
is equal.
11 ... Qd6 12 Be2 e5 13 d5!? (D 2)
Now 13 Be3 runs into 13 ... Qb4+!, while 13 dxe5 Qxe5 essentially concedes
equality. Fischer instead offers a dangerous-looking pawn sacrifice which
Keres should have accepted.
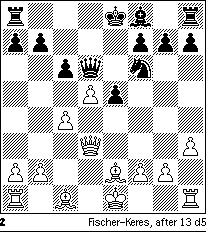
13 ... e4?!
After 13 ... cxd5! 14 cxd5 Qxd5 15 Qxd5 Nxd5 16 Bb5+ Ke7 17 0-0, White has
enough compensation for the pawn so that he should not lose, but not enough
for any advantage. After Keres's move, however, White has a small but clear
advantage, with the two bishops and a queenside pawn majority.
14 Qc2 Be7
Of course, taking the pawn now is suicidal: 14 ... cxd5? 15 cxd5 Qxd5? (15
... Be7 16 Bb5+ Kf8 17 0-0 is also good for White) 16 Qa4+.
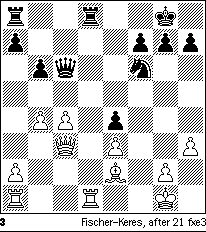
15 dxc6 Qxc6 16 0-0 0-0 17 Be3 Bc5 18 Qc3 b6 19 Rfd1 Rfd8 20 b4 Bxe3
Both sides have been making reasonable, straightforward moves. Now Fischer
makes a committal decision to strengthen his control of the center, but
at the cost of weakening his king's position.
21 fxe3!? (D 3)
21 ... Qc7 22 Rd4
The logical followup, trying to gain control of the d-file.
22 ... a5?!
Keres is seeking active counterplay down the a-file, but this move weakens
his b-pawn too much. Better is 22 ... Rxd4 23 exd4 Nd5 24 Qe1 (24 Qd2 e3!)
Nf4 with reasonable play. Of course, White can play 22 ... Rxd4 23 Qxd4
Rd8 24 Qc3, but if Fischer wanted that position, he could have had it with
an extra tempo by playing 22 Rxd8+.
23 a3 axb4 24 axb4 h5!?
Certainly 24 ... Rxa1+ 25 Qxa1 Rxd4 26 Qxd4 (26 exd4!? h5 is obscure, but
it seems that Black has sufficient counterplay with his e-pawn) is to be
considered, although White would have any chances that exist because of
the two weaknesses on b6 and e4. Keres prefers a position where he has some
offensive possibilities.
25 Rad1 Rxd4 26 Qxd4! Qg3!?
With his last few moves, Keres has followed up on his double-edged plan
of attacking White's weakened king-side. Now he is fully consistent and
jettisons a pawn. Since the tactics that follow seem to win for White, his
decision can be questioned. Nevertheless passive defense with a move like
26 ... Qc6 or 26 ... Rc8 is highly unpalatable. White could maneuver against
Black's pawn weaknesses and Black would have few or no counterchances. If
Black wanted to defend passively, he should have exchanged off both rooks
when he had the chance two moves ago.
27 Qxb6 (D 4)
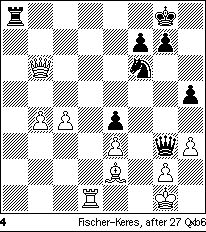
27 ... Ra2
Over the course of the next few moves, Keres must decide how to prosecute
his counterattack. His two basic options are to aim for Ra3, Rxe3, and Re1
or to try to activate his knight by h4, Nh5, and Ng3. He begins by correctly
choosing the latter plan, but then he could have switched over to the former
plan when given a good opportunity. Move order and the exact placement of
the pieces are very important for the next few moves, as the variations
can be decided by a single tempo. Here Keres forces back the white bishop
to f1 and rejects the immediate 27 ... Ra3 because of 28 Qc5! Rxe3 29 Rd8+
Kh7 30 Qf5+ Qg6 31 Qxg6+ Kxg6 32 Kf2, when White has a big advantage. This
response to the Ra3, Rxe3 plan is a recurrent theme.
28 Bf1 h4
Keres tries to activate his knight via h5, while solidifying his control
of g3 for possible perpetuals. If he checked first with 28 ... Qf2+ to force
White's king to the inferior square h1 (because 29 Kh2 Ng4+ draws), then
29 Kh1 h4 30 Qb8+ Kh7 31 Qe5! would cross him up, as 31 ... Qxe3 loses to
32 Qf5+ Kh6 33 Rd8, while 31 ... Ra3 meets 32 c5 Rxe3 33 c6 Rxh3+ (33 ...
Re1 similarly loses after an exchange of rooks and Qf5+) 34 gxh3 Qf3+ 35
Kg1 Qxd1 36 Qf5+ K any 37 c7 and wins. (The desperate 28 ... Ng4 also fails
after 29 Qd8+ Kh7 30 hxg4 f6 31 Qd6.)
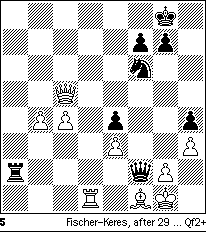
29 Qc5 Qf2+ (D 5)
At first sight, 29 ... g6?? looks attractive, as it prepares Nh5 while maintaining
the black queen's guard over e5, but White can simply refute it with 30
Rd8+ Kh7 31 Qf8, and there are no perpetuals (31 ... Qf2+ 32 Kh2 Qg3+ 33
Kh1; 31 ... Rxg2+ 32 Bxg2 Qe1+ 33 Bf1 Qg3+ 34 Kh1 Qf3+ 35 Bg2; or 31 ...
Rxg2+ 32 Bxg2 Qxe3+ 33 Kf1 Qc1+ 34 Kf2 Qc2+ 35 Kg1 Qc1+ 36 Bf1). Keres's
move forces Fischer to decide now whether his king belongs on h2 or h1.
30 Kh1?
Fischer makes the wrong choice, and spoils his chance for a well-played
victory. The king should be on h2, so that when Black plays Qxf1, it is
not check. Thus, 30 Kh2! prevents the defense that Keres uses in the game,
as again 30 ... g6?? is met with 31 Rd8+ Kh7 32 Qf8, whereas 30 ... Kh7?,
preparing 31 ... g6, is much too slow: 31 b5 g6 32 Qg5! Nh5 33 b6, and Black
is lost.
If, after 30 Kh2! Black tries 30 ... Ra3, then 31 b5 Rxe3 32 Qe5! (not 32
Qc8+? Kh7 33 b6 Rb3 34 b7 Qf4+ when Black is fine) Re1 (What else? If 32
... Rb3 33 c5 and the pawns roll while White's queen defends everything
from e5) 33 Rxe1 Qxe1 34 b6! Qxf1 35 b7 Nd7 36 Qe8+ Kh7 37 Qxe4+! (D 6)
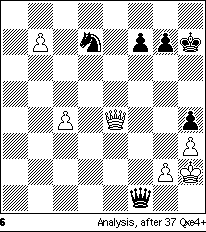
and now 37 ... f5 38 Qxh4+ Kg6 39 Qd4!; 37 ... Kg8 38 Qe8+ Kh7 39 Qxd7;
and 37 ... g6 38 Qxh4+ Kg8 39 Qd8+ Kh7 40 Qxd7 all ultimately lose for Black
when his checks run out.
Finally, if 30 ... Qg3+ 31 Kh1 Ra3 32 b5 Rxe3 33 Qc8+! Kh7 34 Qf5+ Qg6 35
Qxg6+ Kxg6 36 c5 and White's pawns should decide.
30 ... g6
Keres is perhaps "too consistent." He could have switched back
to the Ra3, Rxe3 plan now that his queen is guarding f5 and White's king
is misplaced. After 30 ... Ra3! 31 b5 Rxe3 (D 7),
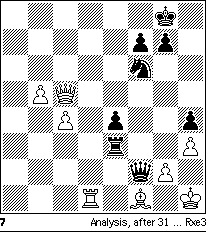
White has to be very careful, or he might even lose. Some possibilities:
a) 32 Qc8+? Kh7 33 b6 Nh5! and Black wins; i.e. 34 b7
Ng3+ 35 Kh2 Re1! 36 b8/Q Nxf1+ 37 Kh1 Ng3+ 38 Kh2 Qg1 mate.
b) 32 b6 Rxh3+ 33 gxh3 Qxc5 34 Rd8+ (34 b7? Qb6) Kh7 35 b7 Qf2 36
Bg2 is a draw, e.g. 36 ... Qe1+ 37 Kh2 Qg3+ 38 Kg1 Qe1+ 39 Bf1 Qe3+ 40 Kh1
Qf2! (this variation was suggested by Patrick Wolff).
c) 32 Qe5 Re1 33 Rxe1 Qxe1 34 Kg1 e3 35 b6 Qf2+ 36 Kh2 Qxf1 37 b7
Nd7 38 Qxe3!? (38 Qe8+ Kh7 39 Qxd7 Qf4+ with perpetual check) and now Black
can either defend with 38 ... Qf6 39 b8/Q+ (39 Qe8+ Kh7 40 Qxd7 Qe5+ draw
or 39 c5 Qd8!) Nxb8 40 Qe8+ Kh7 41 Qxb8 Qd4! 42 Qc7 Kg6 (Wolff) or even
try 38 ... Kf8! when 39 c5 runs into Qb5!, while 39 Qg5 can be met by 39
... Ke8 with the idea of 40 Qxh4 Qb1 41 Qh8+ Nf8 or by 39 ... Qe1 with the
possible continuations 40 Qd8+ Qe8 41 Qxd7 Qe5+ or 40 c5 Qg3+! 41 Qxg3 hxg3+
42 Kxg3 Nb8.
Of course there are other possibilities, but Black's threats fully balance
White's after 30 ... Ra3!
31 Qe5!
Simultaneously paralyzing the knight, tying down Black's queen, and improving
the placement of White's own queen.
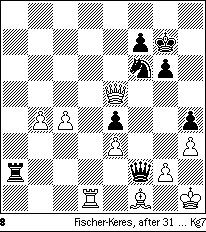
31 ... Kg7 (D 8)
Black protects his knight to free his queen. Also possible is 31 ... Kh7!,
which aims for Nh5, and forces 32 Qf4 Qxf4 33 exf4, when Black can probably
hold by continuing with 33 ... Nh5! as discussed in the next note with the
king on g7. Keres may have decided against this possibility because he most
feared 32 Qf4!? even after 31 ... Kg7; and after the exchange of queens,
the king is somewhat better placed on g7 than h7, as it defends the f7 pawn
and is one step closer to the queenside.
32 c5
32 Qf4!? is an interesting alternative, but Black can probably hold a draw
with correct play. Avoiding the exchange of queens by 32 ... Qb2 33 b5 just
leaves Black with a bad game, so 32 ... Qxf4 33 exf4, and then:
a) 33 ... e3? fails after 34 Re1 (34 Bd3? Rd2! 35 Rxd2
exd2 36 Bc2 Kf8! 37 Kg1 Ne4 38 Kf1 Nc3) Ne4 35 Kg1 (not 35 Rxe3? Ng3+ 36
Kg1 Ra1 37 Rf3 Kf6 and Black's king arrives in time to handle the queen-side
pawns) Ng3 36 Bd3 Ra3 (otherwise White wins the e-pawn for nothing) 37 Rxe3
Nf5 38 Kf2 Nxe3 39 Kxe3 and White has a big advantage.
b) After the stronger 33 ... Nh5!, Black seems to have sufficient
defensive resources. For example, 34 b5 e3! 35 b6!? Ng3+! (not 35 ... e2?
36 Be2 Ng3+ 37 Kh2 Nxe2 38 c5 and Black is hard-pressed to stop the pawns,
e.g. 38 ... Rb2 39 Rd7 Nxf4 40 b7 Ne6 41 c6 [threatening Re7] Kf8 [41 ...
Nc5 42 c7 Rxb7 43 Rxf7+; 41 ... Kf6 42 Rd6] 42 Rd6 Nc7 43 Rd8+ Kg7 44 b8/Q)
36 Kh2 Nxf1+! 37 Rxf1 Rb2 38 c5 (38 Re1 Rxb6 39 Rxe3 Kf6 is a drawn rook
ending) Rb5 39 Rc1 e2, when 40 c6 is met by 40 ... Rxb6 41 c7 Rc6. The same
idea also works if White pushes his c-pawn instead of the b-pawn. White's
best chance to mix it up is probably 34 c5 e3 35 Bb5!? but after 35 ...
Nxf4 (D 9)
Black is probably OK.
Other possibilities for White can be dismissed: Passive defense of the e-pawn
by 32 Qc3?! is met by 32 ... g5, when Black has sufficient counterplay through
his threat of 33 ... g4 and 34 ... h3, while 32 b5 transposes into the next
note after 32 ... Qxe3 33 c5.
32 ... Qxe3 33 c6
Pushing the b-pawn does not work: 33 b5 Rc2 34 b6 (34 c6 transposes to the
game) Rxc5 and the queen is forced onto a worse square. For example 35 Qd6
Ne8 36 Qe7 Rc1 37 Rxc1 Qxc1 38 Qe5+ f6 or 35 Qa1 (35 Qb2 Rc8) Rc8 36 b7
Rb8 37 Qa8 Qf4 and Black successfully blockades the b-pawn.
33 ... Rc2 34 b5
34 c7? Qb6! 35 Rd6 Qf2 backfires for White.
34 ... Rc1 35 Rxc1
34 Qd6? is met by 34 ... Nh5. Black's active defense seems to be coming
just in time.
35 ... Qxc1 36 Kg1 e3 (D 10)

37 c7?!
37 b6! is more clever. After 37 ... Qxc6 (37 ... e2? is pointless: 38 Qxe2
Qxc6 39 Qb2 and Black has given up the e-pawn for nothing) White has two
tries:
a) 38 Qc7?! is tricky, but is nicely met by 38 ... Qd7,
and now 39 Be2 (39 Bc4 Qd1+ 40 Kh2 e2 41 Qxf7+ Kh6 42 Bxe2 Qd6+!; 39 Qa7?
Qd4; best is backing up with 39 Qe5! [suggested by Mark Dvoretsky] and Black
does not seem to have anything better than repeating positions with 39 ...
Qc6) 39 ... Qd2! is OK for Black after the following alternatives:
a1) 40 Bb5, 40 Ba6, or 40 Bf3 e2 41 Bxe2 Qxe2 42 b7 Nd7!,
while 40 Bc4 is met by the similar 40 ... Qf2+ 41 Kh2 e2 42 Bxe2 (42 Qxf7+
Kh6 43 Bxe2 Qxb6) Qxe2 43 b7 Nd7.
a2) 40 b7? Qxe2 41 b8/Q Qf2+ 42 Kh2 e2 43 Qcc8 Qg3+ and Black wins.
a3) 40 Kf1? Ne4! 41 b7 (41 Qe5+ f6 and the knight is taboo) Ng3+
42 Qxg3 hxg3 43 b8/Q Qc1+ 44 Bd1 Qxd1 mate.
b) 38 Qb2! (Wolff) and now 38 ... Qb7 is hopeless for Black after
39 Be2 g5 40 Bf3 Qb8 41 b7 Kg6 42 Qc2+ Kg7 43 Qc8, so Black's best chance
is 38 ... Kh7 (or 38 ... Kh6) 39 b7 Nd7 40 b8/Q Nxb8 41 Qxb8 and White has
good winning chances, although there are certainly many problems left to
overcome.
37 ... e2 38 Qxe2 Qxc7 39 Qf2 g5 (D 11)
Safer than the counterattacking 39 ... Qe5?!, which immediately centralizes
the queen, but at the cost of an important pawn. 40 b6 g5 transposes to
the game, but White can try 40 Qxh4 g5! 41 Qc4! (41 Qf2 g4! 42 hxg4 Nxg4
43 Qh4 f5 draws) Qe3+ 42 Kh2 g4 43 Qd3 and the issue is still not completely
clear.
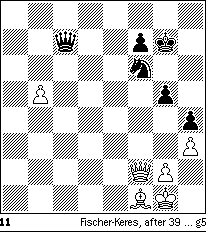
40 b6?!
This makes it easy for Keres to set up a fortress, based on the queen at
e5 and the knight on b8. This is the key idea in the position: Even if the
white pawn arrives at b7, if Black can position his knight on d7 or b8 and
his queen on d6 or e5, while holding onto his kingside pawns, he will draw.
White's only way to proceed against the fortress will be to attack with
both queen and bishop against Black's king, but after any deep foray by
the queen, he will be exposed to a perpetual check. The position is drawn
in any case, but Fischer could have posed more problems for Keres with either
40 Qd4!? or 40 Qe3!?, maintaining control of both b6 and e5, while making
threats against the kingside.
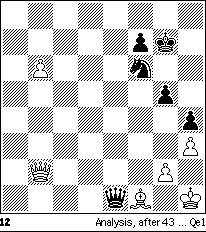
After 40 Qd4!?, Black needs to find the defense 40 ... Qd7! 41 Qb2 (41 Qxd7
Nxd7 can be held easily by Black; while 41 Qe5 is met by 41 ... Qd5) Qe6!
(threatening to set up a blockade on b6; trying to set up a Qd6, Nb8 fortress
by 41 ... Qd6 or 41 ... Kg6 fails after 41 ... Qd6 [Kg6] 42 b6 Kg6 [Qd6]
43 Qc2+ Kg7 44 Qc7 Qd4+ [44 ... Qd7 45 Be2 followed by Bf3 and Bc6] 45 Kh2
Nd5 46 Qd6 and Black's fortress is broken.) 42 b6 Qe3+ 43 Kh1 (43 Qf2 Qe5
transposes to the game) Qe1 (D 12)
and now 44 Qe2 Qxe2 45 Bxe2 leads to a drawn endgame after 45 ... Nd7 46
b7 f5 (Black can maintain a blockade on both sides of the board) while after
44 Qb5!? Ne4 45 b7 (45 Qe5+ f6! 46 Qe7+ Kg6 47 Kh2 Qg3+ draws) Ng3+ 46 Kg1
Qe3+ (46 ... Nxf1? 50 Qxg5+! picks off a pawn) 47 Kh2 (D 13)
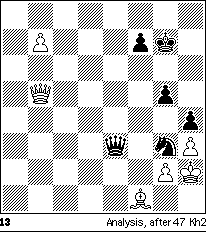
Nxf1+ (47 ... Qc1?? backfires after 48 Qe5+ [not 48 b8/Q?? Nxf1+ 49 Kg1
Ng3+ 50 Kf2 Qd2+ 51 Kf3 Qc3+ 52 Kg4 f5+ 53 Kxg5 Qf6+ with a perpetual] f6
49 Qe7+ Kg6 50 Bd3+ f5 51 Qe6+ Kg7 52 Qe5+ Kf7 53 Bc4+! Kg6 54 Qe6+ Kg7
55 Qf7+ Kh6 56 Qf6+ Kh7 57 Bg8+) 48 Qxf1 Qe5+ 49 Kg1 (or Kh1) Qb2 (D 14),
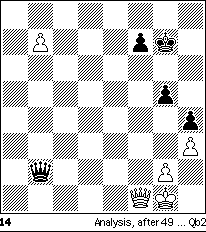
and Black draws as White's king is cooped up in a pawn formation that favors a perpetual. For example, 50 Qf5 Qc1+ 51 Kf2 Qb2+ 52 Ke3 (the entire h1-a8 diagonal is mined) Qb3+ 53 Kd4 Qb4+.
After 40 Qe3!?, Black must be careful not to fall for 40 ... Qg3? 41 Qd4!
when he is tied up, but should instead should simply respond with 40 ...
Kh6! Then after 41 Qd4 Nd7! or 41 b6 Qd6, White cannot break through.
40 ... Qe5! 41 b7 Nd7 42 Qd2 Nb8 (D 15)
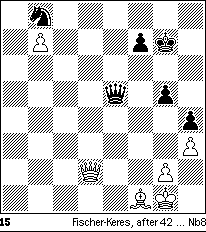
This is given as example #1562 in the queen endings volume of the Encyclopedia
of Chess Endings and is evaluated as a draw, with the rest of the game given
as the "analysis." In fact, there is not much else to say. Black
has established a nice "dynamic fortress."
43 Be2 Kf6 44 Bf3 Ke6 45 Bg4+ f5 46 Bd1 Kf6 47 Qd8+ Kg6 48 Qg8+ Kh6
48 ... Kf6?? 49 Qh8+ Ke6 50 Bb3+.
49 Qf8+ Kg6 50 Qb4 Nc6 51 Qd2 Nd8!
Black seizes the opportunity to simplify.
52 Bf3 Nxb7 53 Bxb7 Qa1+ 54 Kh2
54 Kf2 Qa7+.
54 ... Qe5+ Draw
A fair conclusion to a hard-fought game.
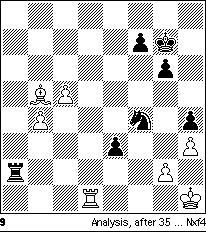
Correction to the analysis of move 30, from ACJ 3
(1995), p. 13:
This conclusion is correct, but some of the analysis offered in support is flawed. In particular, after 30 Kh2 Ra3 31 b5 Rxe3 32 Qe5, the original article considers only 32 ... Rb3 and 32 ... Re1, missing 32 ... Rg3! with the idea of g7-g5-g4 followed by Rxh3 mate, as pointed out by William Kelleher. After 32 ... Rg3 33 c5 g5 34 c6 Kh7! (not 34 ... g4? 35 Qg5+ Kf8 36 Rd8+ Ke7 37 Rd7+!) 35 c7 g4, Black's attack comes first. Therefore, instead of 31 b5? White should play 31 Qe5! immediately, so as to meet 31 ... Rxe3 with 32 c5! saving a precious tempo. Now 32 ... Rg3 33 c6 g5 34 c7 is hopeless for Black, as is 32 ... Qg3+ 33 Qxg3 hxg3+ 34 Kg1 Rc3 35 b5! Rxc5 36 Rd8+ Kh7 37 b6. Black must try 32 ... Re1 33 Rxe1 Qxe1. Now after 34 c6! Qxf1 (34 ... Qxb4 35 c7 Qb7 36 Qc5 Qc8 37 Ba6) 35 c7 Qa6 (35 ... Qc4 36 Qc5; 35 ... Qc1 36 Qc5 Qf4+ 37 Kg1) 36 Qe7! Black is helpless against the threat of 37 Qd8+ followed by 38 c8/Q; e.g. 36 ... Kh7 37 Qd8 Qe6 38 c8/Q Qe5+ 39 Kg1 Qa1+ 40 Kf2 and White eventually brings his queens back to stop the checks.
Jonathan Yedidia is a USCF Senior Master and the 1992 New England Champion. He holds a Ph.D. in Physics from Princeton University and is currently a member of the Society of Fellows at Harvard University.This article appears in ACJ 1
(1992), pp. 78-87.
This page last modified on
28 April 2018.
Copyright (c) 1995-2018 Christopher F. Chabris. All rights
reserved.