Endgame Explorations 2: Perpetual Attack
Noam Elkies
Last issue's column saw White draw by perpetual check indirectly supported
by a stalemate resource. This column is devoted to a related theme: a
positional draw secured by perpetual attack not on the king but on another
piece or pieces. Like the stalemate perpetual, this idea occurs rarely
in practical play (where the usual setting is repeated rook threats against
a queen that has just captured the knight and rook pawns on their original
squares), but is a natural subject for artistic endgames: the stronger force
is continually harassed by attacks which regain no material but leave no
time to exploit an ordinarily overwhelming material superiority.
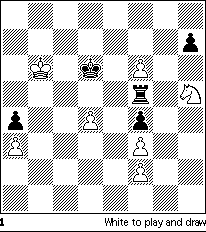
In our first example, Rinck's 1916 endgame from the American Chess Bulletin, the White king buffets a Black rook about the queenside:

White's material advantage of two pawns for the exchange is of course illusory: those tripled f-pawns are going nowhere and White's king seems doomed to spectate helplessly as Black's passed h-pawn marches to the coronation. But that pawn never gets a chance to move.
1 Ng7 Rd5
Forced, as White would win after either 1 ... Rxf6 2 Ne8+ or 1 ... Rg5 2 f7 Ke7 3 f8/Q+ Kxf8 4 Ne6+, a tactic worth remembering.
2 f7 Ke7 3 f8/Q+! Kxf8 4 Kc6! Ra5
Of course 4 ... Rxd4? and 4 ... Rg5? lose to 5 Ne6+.
5 Kb6 Ra8 6 Kb7 Rd8 7 Kc7!
After 7 Ne6+? Ke7 8 Nxd8 Kxd8, White is again helpless against the h-pawn's advance.
7 ... Rd5
7 ... Ke7 8 Nf5+ Ke8 9 Nd6+ (or 9 Ng7+) is perpetual check, since the White king is now well enough placed to refute such Exchange sacrifices as 8 ... Kf6.
8 Kc6
And this square dance continues until Black concedes the draw.
The reader who remembers from the first column that extraneous pieces in a composed endgame are frowned upon may well wonder why Rinck needs both White's f2 and f3 pawns, especially considering the otherwise economical construction of the final drawing position---note in particular the Ng7, controlling three of the rook's escape squares (f5, h5, and e8) directly and two others (d4, g5) indirectly. Unfortunately, Black could capture the knight on his seventh or eighth move, forcing White to move his king again before promoting his passed d-pawn; Black would then queen first, and could proceed capture either of White's f-pawns. The resulting endgame is at least a draw for White if he started with pawns on both f2 and f3, but if either is deleted from the initial position Black can obtain a dangerous passed f-pawn which may well prove decisive. Thus Rinck needed both pawns to assure the endgame's soundness.
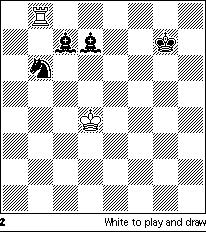
Next, a pretty miniature showing one rook handling three minor pieces:

This pawnless endgame by B. Olympiev won first Honorable Mention (equivalent to second place) in the 1984 Themes-64 tourney. Current endgame theory considers Black's material advantage barely sufficient to win most positions (replace one of his bishops by a knight, and White expects to draw by sacrificing his rook for the other bishop to leave Black with only two knights); but here White can exploit the awkward position of Black's pieces to reach a positional draw.
1 Rb7 Na8
1 ... Bd8 2 Kc5 Na4+ 3 Kd6 captures the pinned bishop and draws.
2 Kc5!
Not yet 2 Ra7?? Bb6+. By threatening 3 Rxc7! Nxc7 4 Kd6 White forces the Bd7 away, immobilizing the Bc7.
2 ... Bf5
2 ... Bg4 3 Ra7 Bf3 4 Ra3 and 2 ... Bh3 3 Ra7 Bg2 4 Ra2 are equivalent.
3 Ra7 Be4 4 Ra4 Bh1 5 Ra1 Be4 6 Ra4
The harried bishop is tied down to the defense of the Na8. Black can try 6 ... Bb7 blocking the seventh rank to invite 7 Ra7?? Bb6+, but after 7 Rb4 Bf3 (7 ... Ba6 8 Ra4 Bb7 9 Rb4 or 7 ... Bc8 8 Ra4 Bb7 9 Rb4 repeats; note that in the last line 8 ... Nb6 fails to 9 Ra7 Nd7+ 10 Kc6) 8 Rb3 Be4 9 Rb4 the bishop is still bound to the long diagonal (9 ... Bg6 10 Ra4 and either 10 ... Nb6 11 Ra7 or 10 ... Bb6+ 11 Kd6! Nc7 12 Rb4). If Black ever interpolates Bb6+ White obtains another positional draw: 6 ... Bb6+ 7 Kd6! (7 Kb5 Bd3+ 8 Kc6
Bf2! and Black soon consolidates his pieces) 7 ... Bb7 8 Rb4 (again the threat
9 Rxb6!) and Black gets nowhere with 8 ... Ba6 9.Ra4 or 8 ... Bf3 9 Rb3 Bh5 10 Ra3.
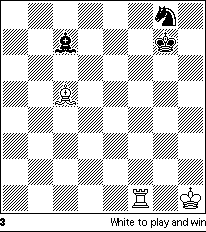
Finally, another pawnless miniature where White wins by cleverly refuting
Black's attempt to draw by perpetual attack on his rook:

This endgame by E. Pogosyants appeared in 1985 in the Russian magazine 64, and represents a modern rendition of Gorgiev's classic 1929 study with the same material.
1 Bd4+ Kh6
Black loses a piece immediately on 1 ... Kh7 2 Rf7+ or 1 ... Kg6 2 Rg1+ Kf7 (or 2 ... Kh7) 3 Rg7+.
2 Rf8 Ne7 3 Rf7 Bd8
3 ... Bd6 4 Rf6+ and 3 ... Nd5 4 Rd7 are hopeless for Black.
4 Bf6
Gorgiev reached this position, with the White king on f1, from the setting White Kf1, Rg1, Bh4; Black Kh8, Bd8, Ne7, after 1 Bf6+ Kh7 2 Rg7+ Kh6 3 Rf7. Pogosyants' setting shows a greater variety of winning methods for White against Black's alternative defenses.
4 ... Kg6
Not yet 4 ... Nc6 5.Bxd8 Nxd8 6.Rd7 and the knight is lost!
5 Rf8 Nc6!
Black must now lose a piece, but has one last resource.
6 Bxd8 Kg7 7 Re8 Kf7 8 Rh8 Kg7
Black seems to obtain a draw by perpetual attack on the rook, which must
remain on the eighth rank to defend the Bd8. And yet ...
9 Bf6+! Kxf6 10 Rh6+
And White emerges a rook ahead after all and wins.
We've now seen drawing resources based on perpetual attacks on knights, bishops and rooks. Can the queen be jostled in a similar manner? This is indeed possible, but, because of the large number of squares the queen has access to, endgames that feature perpetual queen chases verge, even more than Rinck's Diagram 1 above, on the Domination theme: the small forces
characteristic of endgame studies must somehow manage to control most of the queen's escape squares. This theme (usually associated with the capture
of the dominated piece rather than a perpetual attack on it) will be our topic
in the next column.
Noam Elkies is now Professor of Mathematics at Harvard University and is the author of "Chess Art in the Computer Age," published in ACJ 2 (1993). This article originally appeared in Chess Horizons.Next column: Domination.
This page last modified on
28 April 2018.
Copyright (c) 1995-2018 Christopher F. Chabris. All rights
reserved.

