
Endgame Explorations 5: Zugzwang (Part 2)
Noam Elkies
In this second article on zugzwangs in endgame compositions we'll explore progressive zugzwangs: positions in which the paradoxical liability of having the move extends over several turns of play. As usual, this idea is best explained not by a definition but with a good example, such as this subtle miniature by the late J. Kricheli (Shahmat 1986):
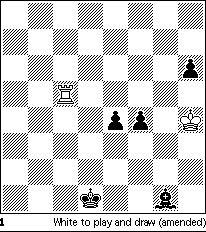
White hopes to trade his rook for Black's connected central pawns and reach a theoretical draw against the h-pawn and "wrong" bishop. First he must sidestep two thematic tries (a "try" is a critical alternative for White that Black can thwart; it is "thematic" if it illustrates or contributes to the theme of the solution).
First, 1 Re5? e3 2 Kg4 e2 3 Kxf4 e1/Q? 4 Rxe1+ Kxe1 5 Kf3! Kf1 6 Kg3 h5 (else 7 Kg2 or 7 Kh2 and draws) 7 Kh4 would draw as planned, except for 3 ... Bh2+! winning. Note that the position after 6 Kg3 is a mutual zugzwang: were it White's turn he would lose quickly after 7 Kf3 Bf2(h2) or 7 Kh3 Kf2 8 Kg4 Kg2 and 9 ... Be3. This explains Black's play against the second thematic try:
1 Rc4! e3
And now 2 Rxf4!? e2 3 Re4 e1/Q+! 4 Rxe1+ Kxe1, and this too is a mutual zugzwang, White losing as before with 5 Kg3 Kf1, 5 Kh3 Kf2, or 5 Kg4 Ke2! 6 Kg3 Kf1. But had Black played here 2 ... Kd2 3 Rxe2+ Kxe2 then White would instead prevail by zugzwang with 4 Kg4! and now 4 ... Kf1(Ke3) 5 Kg3! and 4 ... Ke1 5 Kf3! draw as in the first thematic try, while 4 ... Kf2 blocks the Bg1 and thus abandons the remaining pawn to 5 Kh5. Hence the solution: after 1 Rc4 e3 White interpolates
2 Rd4+! Kc2
Or 2 ... Kc1; blocking the e-pawn with 2 ... Ke1(e2)? only helps White. Only now does White play
3 Rxf4 e2 4 Re4 Kd2
Note the threat 5 ... Be3! winning outright-- if 5 Re8 Be3 6 Rd8+ the Black king runs to h5 or h7 and then the e-pawn promotes.
5 Rxe2+ Kxe2 6 Kg4!
And White draws by the progressive zugzwang analysis above. Remarkable depth with only four men in play!
The "corresponding squares" theme represents the natural culmination of the idea of progressive zugzwang. This theme is important enough in practical play that manuals on pawn endgames often devote several pages to it. Fortunately we're unlikely to ever encounter over the board a situation as intricate as the following (K. Ebersz, Magyar Sakkvilag 1930):
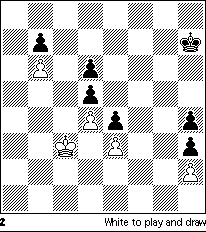
If this looks simple, consider that White can only draw by starting 1 Kb2! Kg8 2 Ka1!!. But further explanation requires not a listing of variations
but a "backwards search" akin to the methods recently used by exhaustive computer analysis of endgames such as king and two bishops versus king and knight (KBBKN) and KQPKQ (see the January-February 1989 issue of Chess Horizons).
Begin by observing that the White king is permanently restrained by the rigid pawn structure, but the Black king has two potential routes for penetration, via g4-f3 or c6. Thus, whenever Black plays Kg4 White must respond Ke2 or Kf2, and actually Ke2 is forced since the White king must be able to reach a5 in the four moves it takes the Black king to reach c6 from g4 (there's no time for White to reach b5 first, and conversely if White ever responds Kb5 to Black's Kd7 he'll never get back to the kingside in time to stop Kf3). Next note that there's only one way for the Black king to get from g4 to c6 in four moves, and likewise for the White king from e2 to a5; so we have five pairs of corresponding squares: we've already seen that Black's g4 corresponds to White's e2, and c6 to a5, and now we also have f5, e6, d7 corresponding to d2, c3, b4 respectively (for instance on Black's Kf5 White must respond Kd2 so as to be within one move of f2 and within three of a5). What, then, if Black plays Kf6? This threatens both Kf5 and Ke6, to which White must respond Kd2 and Kc3 respectively; so on Kf6 White must play Kc2. Again, Kg5 threatens Kg4, Kf5 and Kf6 and so forces Kd1 to control the corresponding e2, d2, c2. Proceeding in this manner we find the corresponding pairs e7:b3, g6:c1, f7:b2, e8:a3, d8:a4, h5:d2, h6:c2, g7:b1, f8:a2, and finally h7:b2 and g8:a1 which explains White's mysterious retreat to the corner. Adding to this the pair h8:a2 we further find that all these corresponding squares give mutual zugzwangs: White to move must abandon the corresponding square and lose, but with Black to move the White king can always stay on the corresponding square and rebuff Black's incursions via g4 or c6 indefinitely, assuring the draw.
And finally, a rare example of a battle of corresponding squares between knight and bishop:
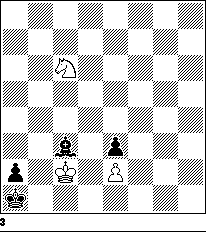
Without the pair of e-pawns, Black would draw this endgame easily, provided he always made sure it was White's move in a position such as Diagram 3. To win, White must safely move his knight to c1, d2, d4, c5 or a5 to play Nb3 mate; but the first four of these five squares can be controlled by Be3, and the last three by Bb6, so Black draws by moving his bishop back and forth on the diagonal g1-a7, playing Be3 every other move unless White has just played Nc6 or Nb7 in which case Black plays Bb6, and if then Kc1 then simply Be3+ forcing Kc2 and then again Bb6 and White can make no progress. But two years ago I discovered that adding the e-pawns turns that easy draw into an intricate struggle between the knight, which now has two targets (b3 and e3), and the bishop, now excluded from the critical square e3 by Black's own pawn (the "bad bishop" syndrome).
Editor's note: The following analysis is concerned with various starting positions in which the kings and pawns are placed as in Diagram 3, but the positions of the White knight and Black bishop can vary. Thus, the moves labeled "1" in each line simply refer to the starting positions of those two pieces, not to actual lines of play starting from Diagram 3.
Thus against 1 Nc6, threatening 2 Nd4 or 2 Na5 and mate next, Black must reply 1 ... Bc3 as in Diagram 3, not 1 ... Bb6? when 2 Kc1! forces mate in three (2 ... Ba5(d4) 3 Nd4(a5)! Bd2(b2)+ 4 Kc2 and 5 Nb3#) since Black lacks the saving 2 ... Be3+. (On 1 ... Bc3, Black fears neither 2 Kc1 Bb2(d2)+ 3 Kc2 Bc3 nor
2 Kxc3?? Kb1.) Likewise if 1 Nb7 (intending 2 Na5(c5)) 1... Bb4!, not 1 ... Bb6? 2 Kc1!; if 1 Nd3 Ba3! (defending c1 and c5); and 1 Nc4, threatening 2 Na5 and 3 Nb3#, as well as 2 Nxe3, must be met by 1 ... Bd2!, not 1 ... Bb6? 2 Kc1! and now either 2 ... Ba5 3 Nxe3! Bd2 4 Kxd2 and 5 Nc2(+) or 2 ... Bc7(d8) 3 Na3! (3 Ne3?? Bf4(g5)) and 4 Nc2#. Now suppose White plays 1 Nd8 when Black cannot capture it; then Black must prepare to answer 2 Nc6 or 2 Nb7 with 2 ... Bc3 or 2 ... b4 by playing 1 ... Ba5!, not 1 ... Be1(d2)? 2 Ne6 Bc3(b4) 3 Nc5(d4) and 4 Nb3#. Thus 1 Ne6 forces 1 ... Bb6! to control d8 as well as d4 and c5; if then 2 Kc1!? Black holds with 2 ... Bc5! 3 Nd8 (2 Nf4 Ba3+! 4 Kc2 Bc5!-- see below; 3 Nxc5 stalemates) 3 ... Bb4! 4 Nc6(b7) (or 4 Kc2 Ba5!) 4 ... Bd2+! 5 Kc2 Bc3(b4). So 1 Nf4 corresponds to 1 ... Bc5 (2 Nd3(e6) Ba3(b6)), and 1 Nb4 to 1 ... Bb2 (2 Nd3(c6) Ba3(c3)). Furthermore, 1 Nd5, hitting e3, b4 and f4, corresponds to 1 ... Bd4 (2 Nb4(f4) Bb2(c5)), and finally 1 Nd6 forces 1 ... Bc3 because Black must prepare 2 Nc4(b7) Bd2(b4), and 1 ... Ba5? (1 ... Bd2(e1)? 2 Nf5 is quicker) allows 2 Nf5 Bb6 3 Ne7 Bd4 (or 3 ... Ba5, intending 4 Nc6 Bc3) 4 Nd5! puts Black in zugzwang. Adding the pairs Ne5(b2):Bb4 to these eleven pairs of corresponding squares c6:c3, b7:b4, d3:a3, c4:d2, d8:a5, e6:b6, f4:c5, b4:b2, d5:d4, f4:c5, d6:c3 we readily confirm that, having attained one of these thirteen positions, Black can maintain the correspondence indefinitely to hold the draw, so these positions are all mutual zugzwangs with Black drawing if it's White's move, but losing if Black's.
To turn this theoretical analysis into an artistic endgame composition, I started with the mutual zugzwang Nd6:Bc3 and looked for a setting in whose introductory play the White knight winds up at d6 and the Black bishop could be anywhere on the long diagonal b2-h8 depending on an earlier White choice. The resulting endgame shared first prize in the 1987 M. Czerniak Memorial Tourney:
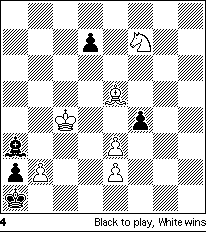
Here White threatens to open the long diagonal and trade his bishop for Black's a-pawn to reach a winning endgame, as after 1 ... Be7 2 b4+ Kb1 3 exf4. On 1 ... Bxb2 2 Kb3! Bxe5 3 Kc2! fxe3 (after 3 ... d6 4.e4 Black drops a pawn immediately and soon loses, and after 3 ... Bc7 4 e4 d6 the simplest win is to trade pieces on c1, forcing Black to permit White to promote on e8) 4 Nxe5 d5 5 Nd3 and mate in three. So Black first dislodges the Be5 from the knight's protection:
1 ... d6!
The bishop must move since Black even wins after 2 bxa3? dxe5, 2 Kb3? Kb1!, or 2 Nxd6? Bxd6 3 Bxd6 Kb1. The attempt 2 Bh8!? Bxb2 3.Kb3 Bxh8 4.Kc2 fxe3 5 Nxh8 fails because the knight is then too far to stop stalemate after 5 ... d5; and if instead 5 Nd6 Bc3!! and draws as in the analysis of Diagram 3. Therefore...
2 Bc3!! Bxb2 3 Kb3! Bxc3 4 Kc2 fxe3 5 Nd6
And thanks to 2 Bc3!! (rather than 2 Bd4, 2 Bf6, 2 Bg7, or 2 Bh8) now Black is in zugzwang instead of White. White must still play accurately to exploit this advantage against Black's toughest defense:
5 ... Ba5! 6 Nf5 Bb6 7 Ne7 Bd4
Or 7 ... Ba5, hoping for 8 Nc6? Bc3 with a draw-- Diagram 3.
8 Nd5
Mutual zugzwang again.
8 ... Bc5
Else either 9 Ne3, or 9 Nb4 and 10 Nd3(c6).
9 Nf4
Zugzwang once more!
9 ... Bb4(d6,e7,f8)
Hoping for 10 Nd3? Ba3.
10 Ne6 Bc5! 11 Nd8! Bd4 12 Nb7! Bb6 13 Kc1!
And White mates in three more moves.
I hope that the labor of following these analysis has rewarded the reader with an appreciation of the subtle beauty of such "corresponding squares" endgames. Next issue we'll turn from this heavy dose of close analysis to lighter fare: the ever-popular underpromotion theme.
Noam Elkies is now Professor of Mathematics at Harvard University and is the author of "Chess Art in the Computer Age," published in ACJ 2 (1993). This article originally appeared in Chess Horizons.Next column: Underpromotion (Part 1).
This page last modified on
28 April 2018.
Copyright (c) 1995-2018 Christopher F. Chabris. All rights
reserved.